
Ground Assault Front Bike Suspension: A Comprehensive Guide
Ground Assault’s front bike suspension demands a dedicated owner’s manual PDF for optimal setup, maintenance, and troubleshooting – ensuring peak performance and rider safety.
Ground Assault suspension systems are engineered for demanding mountain biking conditions, prioritizing durability and control. Unlike standard bicycle suspension, Ground Assault components feature reinforced builds and specifically tuned damping.
Understanding this advanced system requires access to the official Ground Assault Front Bike Suspension Owners Manual PDF. This comprehensive guide details setup procedures, adjustment techniques, and crucial maintenance schedules. Proper utilization of the manual ensures optimal performance, extends component lifespan, and maximizes rider safety during challenging terrain.
Consistent reference to the PDF is key to unlocking the full potential of your Ground Assault suspension.
Understanding the Importance of the Owner’s Manual PDF
The Ground Assault Front Bike Suspension Owners Manual PDF is paramount for maximizing your riding experience. It’s a comprehensive resource detailing everything from initial setup and sag adjustment to advanced tuning and troubleshooting.
Neglecting the manual can lead to improper adjustments, premature wear, and compromised safety. Accessing the PDF ensures you understand the unique characteristics of Ground Assault’s reinforced components and tuned damping.
Regularly consulting the manual facilitates proactive maintenance, preventing costly repairs and guaranteeing peak performance on every ride. It’s your key to unlocking the system’s full potential.
Suspension System Components
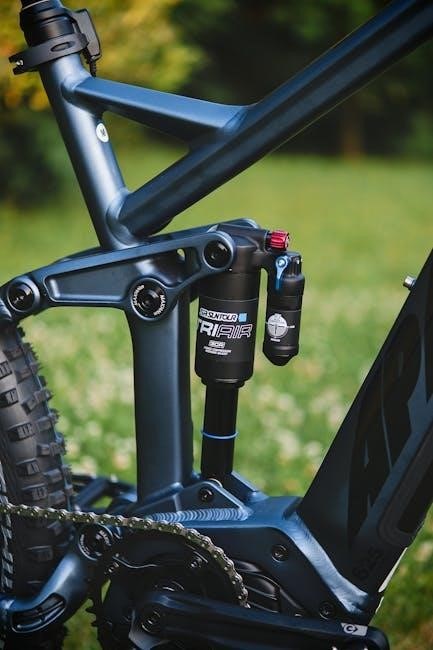
Ground Assault’s front suspension features a robust fork structure, air chambers, and a sophisticated damping system – details thoroughly explained within the owner’s manual PDF.
Fork Structure and Key Parts
Ground Assault’s front fork is engineered for durability, utilizing reinforced components to withstand demanding terrain. The manual PDF details the stanchion tubes, sliders, and crown – crucial elements of the fork’s structural integrity. Understanding these parts is vital for proper maintenance.
Key components include the fork brace, preventing flex, and the seals, maintaining air and lubrication. The manual provides exploded diagrams illustrating each part’s location and function. Proper identification aids in troubleshooting and replacement, ensuring continued optimal performance of your Ground Assault bike’s suspension.
Air Chamber – Positive and Negative
Ground Assault air suspension forks utilize both positive and negative air chambers, detailed within the owner’s manual PDF. The positive chamber dictates spring rate, supporting rider weight, while the negative chamber controls initial fork sensitivity and prevents harshness.
Equalizing pressure between these chambers is crucial for balanced performance, achieved by compressing the fork repeatedly – as outlined in the manual. Proper adjustment, guided by the PDF, enhances small bump compliance and overall control, maximizing the benefits of your Ground Assault bike’s suspension system.
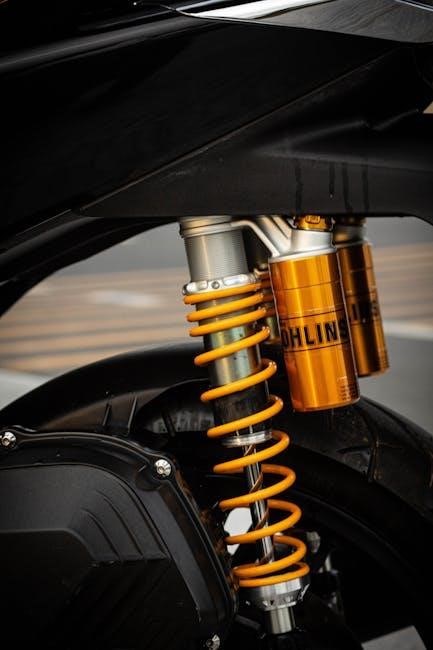
Damping System Explained
The Ground Assault fork’s damping system, thoroughly explained in the owner’s manual PDF, controls the speed of fork compression and rebound. Compression damping resists fork compression, preventing harsh bottoming-out, while rebound damping controls the return speed after compression.
Understanding low-speed and high-speed damping – detailed within the manual – allows for fine-tuning based on terrain and riding style. Correct damping settings, as guided by the PDF, enhance control, traction, and overall ride quality on your Ground Assault bike.

Preparing for Suspension Setup
Consult the Ground Assault manual PDF to gather necessary tools and initial air pressure guidelines before commencing your front suspension setup process.
Tools Required for Adjustment
Successfully adjusting your Ground Assault front suspension necessitates a few key tools, detailed within the owner’s manual PDF. A reliable digital shock pump is paramount for precise air pressure adjustments in both the positive and negative air chambers.
You’ll also require a torque wrench to ensure all bolts are tightened to the manufacturer’s specifications, preventing damage. Measuring tools, like a ruler, are crucial for accurately determining sag. Finally, consider having a set of Allen wrenches readily available, as they are commonly used for damping adjustments.
Initial Air Pressure Guidelines
Before commencing suspension setup, consult your Ground Assault front suspension owner’s manual PDF for recommended starting air pressures. These guidelines, typically found within the manual, are based on rider weight and are a crucial starting point.
Generally, lighter riders (under 150lbs) should begin with lower pressures, around 70-90 PSI, while average riders (150-180lbs) might start around 90-110 PSI. Heavier riders (over 180lbs) may require pressures exceeding 110 PSI. Remember, these are merely starting points; sag measurement is vital for fine-tuning.
Equalizing Air Pressure Between Chambers
Following initial air pressure setup, as detailed in your Ground Assault front suspension owner’s manual PDF, it’s essential to equalize pressure between the positive and negative air chambers. This ensures consistent performance and prevents stiction.
Compress the fork repeatedly – at least 50% of its full travel – several times. This action allows air to transfer between chambers. Consistent compression helps achieve equilibrium. Refer to the manual for specific recommendations regarding the number of cycles needed for optimal equalization before proceeding to sag measurement.

Setting Proper Sag
Ground Assault suspension performance hinges on correct sag, detailed in the owner’s manual PDF; it’s the crucial first step for optimal air pressure adjustments.
What is Sag and Why it Matters
Sag refers to the amount your Ground Assault front suspension compresses under your weight. Proper sag is paramount for maximizing performance, as it ensures the suspension operates within its optimal travel range.
The Ground Assault owner’s manual PDF emphasizes that correct sag improves traction by allowing the tire to maintain contact with the ground, even over uneven terrain.
Incorrect sag – too little or too much – negatively impacts handling, comfort, and control. Too little sag results in a harsh ride and reduced traction, while excessive sag leads to bottoming out and instability. Finding the sweet spot, guided by the manual, unlocks the full potential of your suspension.
Step-by-Step Sag Measurement Process
The Ground Assault front bike suspension owner’s manual PDF details a precise sag measurement process. First, set the fork to the suggested air pressure, compressing it repeatedly – at least 50% of its travel – to equalize pressure between the positive and negative chambers.
Next, with all riding gear on, carefully sit on the bike. Have an assistant support the bike’s weight. Measure the distance the suspension compresses from the seal to a fixed point.
Compare this measurement to the total fork travel, as outlined in the manual, to determine your sag percentage. Repeat for accuracy.
Adjusting Air Pressure for Optimal Sag
Refer to your Ground Assault front bike suspension owner’s manual PDF for specific sag recommendations. If sag is too little, decrease air pressure in small increments (5-10 PSI), re-measuring after each adjustment. Conversely, if sag is excessive, increase air pressure similarly.
Remember to re-equalize air pressure between the positive and negative chambers after each pressure change, compressing the fork as detailed in the manual.
Iterate until achieving the recommended sag percentage for your rider weight and riding style.
Suspension Adjustment for Rider Weight
Ground Assault manuals PDF provide tailored air pressure charts based on rider weight, optimizing suspension performance for light, average, and heavier cyclists.
Light Rider Adjustments
Ground Assault front suspension setup for lighter riders (under 150 lbs) necessitates careful attention to air pressure, as insufficient weight can lead to bottoming out. The manual PDF recommends starting with lower pressures, incrementally increasing until optimal sag is achieved;
Prioritize utilizing the negative air chamber to maintain bottom-out resistance. Referencing the manual’s specific charts is crucial; avoid simply copying settings from heavier riders. Focus on achieving full travel without harshness, ensuring the suspension remains active and responsive throughout the ride. Consistent monitoring and minor adjustments are key.
Average Rider Adjustments
For riders between 150-180 lbs, the Ground Assault front suspension manual PDF provides a solid baseline for setup. Begin with the manufacturer’s suggested air pressure, detailed within the manual, and meticulously measure sag.
Adjust air pressure in small increments – typically 5 PSI – until the correct sag is attained. Pay close attention to both positive and negative chamber pressures, ensuring they are balanced. The goal is a plush yet supportive feel, absorbing impacts without excessive dive or harshness; Regular checks are vital for maintaining optimal performance.
Heavy Rider Adjustments
Riders exceeding 180 lbs require increased air pressure in their Ground Assault front suspension, as outlined in the owner’s manual PDF. Start with a pressure 10-15 PSI above the average rider recommendation and carefully measure sag.
Prioritize bottoming resistance while maintaining a reasonable level of small bump compliance. The manual emphasizes the importance of equalizing air pressure between chambers. Consistent adjustments, guided by the PDF, are crucial for preventing harshness and ensuring controlled performance during aggressive riding.
Advanced Suspension Tuning
Ground Assault’s manual PDF details rebound and compression damping adjustments, enabling riders to fine-tune performance based on terrain and riding style for optimal control.
Rebound Damping Adjustment
Rebound damping controls the speed at which the fork extends after compression. The Ground Assault manual PDF emphasizes finding the right balance; too slow, and the fork ‘packs down’ over successive bumps, losing absorption. Too fast, and it feels bouncy or uncontrolled.
Adjustment typically involves turning a dial or using shims. Start with the manufacturer’s recommended setting (found in the manual) and make small adjustments – one click at a time – while testing on familiar terrain. Observe how the fork recovers; aim for a controlled return without feeling harsh or sluggish. The manual provides detailed guidance on interpreting these sensations.
Compression Damping Adjustment
Compression damping governs how quickly the fork compresses when encountering a bump. The Ground Assault manual PDF details how this impacts ride feel, ranging from plush and forgiving to firm and supportive; Adjusting compression affects small bump sensitivity and resistance to bottoming out.
Like rebound, adjustments are made incrementally. The manual explains the difference between low-speed and high-speed compression, catering to different terrain types. Begin with the recommended setting and fine-tune based on riding conditions and preference, prioritizing control and comfort. Careful adjustment, guided by the manual, maximizes performance.
Low-Speed vs. High-Speed Damping
Ground Assault suspension utilizes both low-speed and high-speed damping, detailed within the owner’s manual PDF. Low-speed damping controls movement during weight shifts, braking, and smooth trail features. High-speed damping manages impacts from larger obstacles like rocks and square-edged bumps.
The manual emphasizes independent adjustment of each. Increasing low-speed compression adds support during cornering, while adjusting high-speed compression prevents harsh bottoming out. Understanding this distinction, as outlined in the PDF, is crucial for a balanced and controlled ride experience.
Routine Maintenance Procedures
Ground Assault’s manual PDF stresses regular fork cleaning, lubrication, and seal inspection to maintain optimal performance and extend the suspension’s lifespan.
Fork Cleaning and Lubrication
Ground Assault’s manual PDF emphasizes meticulous fork cleaning after each ride, especially in harsh conditions, to remove dirt and debris. Use mild soap and water, avoiding harsh chemicals that can damage seals.
After cleaning, thoroughly dry the fork stanchions. Apply a suspension-specific lubricant sparingly to the stanchions and seals, cycling the fork several times to distribute evenly. This reduces friction and prevents premature wear.
Regular lubrication, as detailed in the manual, is crucial for smooth operation and longevity, preserving the suspension’s responsiveness and preventing costly repairs. Consistent care ensures optimal performance.
Checking for Play in the Fork Brace
The Ground Assault manual PDF stresses the importance of regularly inspecting the fork brace for excessive play. Excessive movement—more than 1mm—indicates potential bearing wear or loosening of the brace bolts.
To check, firmly grasp the fork legs near the brace and attempt to move them laterally. Any noticeable wobble or looseness requires immediate attention. Refer to the manual for proper torque specifications when tightening brace bolts.
Addressing play promptly prevents further damage and maintains steering precision, ensuring a safe and controlled riding experience. Ignoring this can compromise handling and lead to accidents.
Seal Inspection and Replacement
The Ground Assault manual PDF details crucial seal inspection procedures. Regularly examine fork seals for cuts, cracks, or signs of oil leakage. Even minor damage compromises performance and can lead to air loss or contamination.
Wipe the stanchions clean and cycle the suspension to reveal any imperfections. Replacement requires specialized tools and techniques outlined in the manual. Incorrect installation can cause further issues.
Prompt seal replacement maintains damping efficiency and prevents internal component damage, extending the lifespan of your Ground Assault front suspension.
Troubleshooting Common Issues
Ground Assault’s manual PDF provides solutions for issues like air leaks, sticking suspension, and harsh bottoming out, ensuring continued optimal performance and safety.
Fork Leaking Air
Fork leaking air is a common issue addressed within the Ground Assault Front Bike Suspension Owners Manual PDF. This often indicates a problem with the seals, valve cores, or air chamber itself. The manual details a step-by-step process for identifying the source of the leak, recommending inspection of the stanchion tubes and seal surfaces.
It emphasizes the importance of proper lubrication during seal replacement and provides torque specifications for secure installation. Ignoring air leaks can severely impact suspension performance and potentially lead to dangerous riding conditions, so consulting the PDF is crucial for safe and effective repair.
Sticking Suspension
Sticking suspension, detailed in the Ground Assault Front Bike Suspension Owners Manual PDF, typically stems from contamination or lack of lubrication within the fork. The manual guides users through a thorough cleaning process, emphasizing the removal of old grease and debris. It recommends using a specific type of fork oil, outlining the correct filling procedure to ensure optimal damping performance.
Furthermore, the PDF highlights the importance of regular seal cleaning and lubrication to prevent dirt ingress. Addressing sticking suspension promptly restores responsiveness and prevents potential damage to internal components, ensuring a smooth and controlled ride.
Harsh Bottoming Out
Harsh bottoming out, as addressed in the Ground Assault Front Bike Suspension Owners Manual PDF, often indicates insufficient air pressure or incorrect damping settings. The manual stresses the importance of setting proper sag – the amount the fork compresses under rider weight – as a foundational step; It details a step-by-step sag measurement process.
Additionally, the PDF explains how to adjust compression damping to control the fork’s resistance to bottoming. Correctly tuning these parameters, guided by the manual, enhances control and comfort, preventing jarring impacts and maximizing performance on challenging terrain.

Ground Assault Suspension Specifics
Ground Assault distinguishes itself with durable, reinforced components and uniquely tuned damping, detailed within the Owners Manual PDF for peak performance.
Durability and Reinforced Components
Ground Assault suspension systems are engineered to withstand the rigors of aggressive riding, differing from standard bicycle forks. The manual PDF highlights reinforced stanchions and sliders, minimizing bending and buckling under stress.
Internal components, like bushings and seals, are upgraded for extended lifespan and resistance to contamination. This focus on robust construction, detailed in the manual, ensures reliable performance even in demanding conditions. The Ground Assault design prioritizes longevity, reducing the frequency of replacements and maximizing rider confidence, as explained in the downloadable PDF.
Tuned Damping Characteristics
Ground Assault suspension isn’t simply about strength; it’s about controlled movement. The manual PDF details specifically tuned damping characteristics designed to absorb high-impact forces efficiently. This translates to improved traction, stability, and rider comfort on rough terrain.
Unlike generic damping systems, Ground Assault’s tuning prioritizes predictable handling and minimizes harshness. The manual explains how to adjust compression and rebound damping to suit individual riding styles and trail conditions. Understanding these nuances, as outlined in the PDF, unlocks the full potential of the suspension.

Finding and Downloading the PDF Manual
Accessing the Ground Assault Front Bike Suspension Owners Manual PDF is crucial; check the official Ground Assault website or reputable third-party archive sites.
Official Ground Assault Website
Ground Assault’s official website is the primary and most reliable source for obtaining the Front Bike Suspension Owners Manual PDF. Navigate to the “Support” or “Downloads” section, typically found in the website’s footer or main menu.
Look for a dedicated area for bike manuals, filtering by model year if necessary. The PDF should be readily available for direct download, ensuring you have the latest version with accurate information. Prioritize this source to guarantee authenticity and avoid potentially outdated or incorrect manuals from other platforms.
Always verify the file’s integrity after downloading.
Third-Party Manual Archives
While the Ground Assault website is preferred, several third-party manual archive websites may host the Front Bike Suspension Owners Manual PDF. These platforms often compile manuals for various brands and models, offering an alternative download source.
However, exercise caution when using these sites. Verify the manual’s authenticity by comparing it to information found on the official Ground Assault website. Ensure the PDF is complete, legible, and corresponds to your specific bike model and year to avoid incorrect setup or maintenance procedures.
Ensuring Manual Authenticity
Downloading the Ground Assault Front Bike Suspension Owners Manual PDF requires verifying its authenticity. Cross-reference the document’s content with information available on the official Ground Assault website. Look for consistent branding, model-specific details, and accurate technical specifications.
Beware of outdated or incomplete manuals circulating online. A legitimate PDF will provide comprehensive guidance on setup, maintenance, and troubleshooting. Prioritize downloads from trusted sources and always double-check critical information before applying it to your suspension system.

Safety Precautions
Ground Assault suspension requires adherence to proper torque specifications and riding within limits; regular inspection intervals, guided by the manual PDF, are crucial.
Proper Torque Specifications
Ground Assault front suspension components demand precise torque values during installation and maintenance, detailed within the manual PDF. Incorrectly tightened bolts can compromise structural integrity, leading to component failure and potential rider injury.
The manual specifies torque ranges for fork brace bolts, air cap screws, and damping adjustment knobs. Utilizing a calibrated torque wrench is essential; avoid estimations. Over-tightening can strip threads or damage components, while under-tightening risks loosening during aggressive riding.
Always refer to the Ground Assault manual PDF for the specific torque values applicable to your model year and component. Prioritize safety by adhering to these specifications diligently.
Riding Within Suspension Limits
The Ground Assault front suspension, as detailed in the owner’s manual PDF, is engineered for demanding terrain, but has operational limits. Exceeding these limits—through excessively large jumps or high-impact landings—can cause damage and void warranty coverage.
The manual outlines recommended riding styles and terrain suitability. Understand your skill level and progressively challenge yourself. Regularly inspect your suspension for damage after intense riding.
Prioritize controlled riding techniques and avoid pushing beyond your capabilities. Respecting these limits ensures both component longevity and rider safety, maximizing the suspension’s performance.
Regular Inspection Intervals
The Ground Assault front suspension owner’s manual PDF stresses consistent inspection. A pre-ride check for leaks, play in the fork brace (exceeding 1mm is critical), and smooth travel is essential.
More thorough inspections should occur every 25 hours of riding or monthly, whichever comes first. This includes checking seal condition and lubrication.
Post-ride inspections after particularly rough terrain are also recommended. Adhering to these intervals, as outlined in the manual, proactively identifies potential issues, preventing costly repairs and ensuring optimal performance.

Gear Shifting Basics (Related to Ride Control)
Ground Assault bikes benefit from understanding gear shifts; downshifting at the front or upshifting at the rear maintains optimal cadence and control.
Front and Rear Derailleur Function
Derailleurs are pivotal for efficient Ground Assault riding, managing chain movement across gear clusters. The front derailleur shifts the chain between the front chainrings, offering wider gear ranges for varied terrain. Conversely, the rear derailleur guides the chain across the cassette, providing finer adjustments for precise cadence control.
Understanding that a downshift at the front appears as an upshift at the rear is crucial. Proper derailleur function, detailed in the Ground Assault Front Bike Suspension Owners Manual PDF, ensures smooth transitions and maximizes power transfer, enhancing overall ride control and performance.
Upshifting and Downshifting Explained
Upshifting involves moving to a larger gear, making pedaling harder but covering more distance per revolution – ideal for descents or high-speed sections. Downshifting shifts to a smaller gear, easing pedaling effort for climbs or slower speeds. The Ground Assault system requires precise timing for seamless transitions.
Remember, a downshift at the rear feels like an upshift, and vice versa. Mastering these techniques, as detailed in the Ground Assault Front Bike Suspension Owners Manual PDF, optimizes power delivery and maintains momentum, crucial for navigating challenging trails effectively.
Leave a Reply